

Learning how to use Google Authenticator transfer is important when you buy a new phone, replace a damaged device, or want to keep your two-factor authentication codes accessible. With the right steps, you can move your codes safely without losing access to your important accounts.
Introduction
In today’s digital world, account security is more important than ever. Many people use Google Authenticator to protect their online accounts with two-factor authentication, also called 2FA. This app generates temporary verification codes that help confirm your identity when you sign in to services such as email, banking apps, social media platforms, business tools, and other private accounts. However, one common problem appears when someone changes their phone: they suddenly realize that their login codes are still saved on the old device. This is why understanding how to use Google Authenticator transfer is extremely useful. The transfer feature allows users to move their existing authenticator codes from one device to another without setting up each account from the beginning.
Many users panic when they get a new phone because they think downloading Google Authenticator again will automatically restore all codes. In some cases, codes may sync if the user has chosen to save them with a Google Account, but in other cases, the codes are stored only on the device. If the codes are not synced, the user needs to use the transfer option manually. The process is not difficult, but it must be done carefully. If you reset your old phone too early, sell it, lose it, or delete the app before transferring the codes, you may lose access to accounts protected by those codes. This guide explains how to use Google Authenticator transfer in a simple, human-friendly way so you can move your codes safely, avoid common mistakes, and keep your accounts secure.
What Is Google Authenticator Transfer?
Google Authenticator transfer is a feature inside the Google Authenticator app that allows users to move their existing 2FA codes from an old phone to a new phone. Instead of opening every website separately and setting up authentication again, the transfer tool creates a QR code on the old device. The new device then scans that QR code and imports the selected accounts. This makes the process quicker and easier, especially for people who have many accounts stored in the app.
The transfer feature is especially helpful when you are upgrading your phone, switching from Android to iPhone, moving from iPhone to Android, or keeping a backup device. It reduces the risk of being locked out of your accounts because it lets you carry your authentication codes with you. However, it is important to understand that the transfer process usually requires access to the old device. If the old phone is lost, broken, wiped, or unavailable, manual transfer may not be possible. In that case, you may need to use recovery codes, backup login methods, or contact each service to reset two-factor authentication.
Why You Need to Transfer Google Authenticator Correctly
Knowing how to use Google Authenticator transfer is not only about convenience; it is also about account safety. Your authenticator codes are connected to sensitive accounts, and losing them can create serious problems. For example, if your email account, bank account, business dashboard, or cloud storage account requires a 2FA code, you may not be able to sign in without access to Google Authenticator. This can delay important work, block access to financial information, or make account recovery stressful.
A correct transfer also protects you from security risks. When you transfer codes properly, you remain in control of where your codes are stored. You can confirm that your new phone has imported the correct accounts, remove codes from the old phone when appropriate, and keep your authentication setup organized. If you transfer in a hurry without checking the imported codes, you may later discover that some accounts were missed. Therefore, the safest method is to keep both phones nearby, update the app on both devices, transfer the codes, test important logins, and only then remove or reset the old device.
Before You Start the Transfer
Before learning the exact steps for how to use Google Authenticator transfer, you should prepare both devices. First, make sure your old phone still has the Google Authenticator app installed and working. Open the app and confirm that your codes are visible. If the app is empty or you are signed into the wrong Google Account, you may need to check whether your codes are saved under another account or stored locally on the device.
Second, install the latest version of Google Authenticator on your new phone. Updating the app helps avoid transfer errors, missing menu options, or QR code scanning issues. Third, keep both phones physically close to each other because the new phone must scan a QR code shown on the old phone. Fourth, make sure your device screen is bright enough for the QR code to scan properly. Fifth, do not share, screenshot, or send the transfer QR code to anyone. The QR code contains sensitive information related to your authentication accounts, so it should be treated like a password.
It is also wise to check your most important accounts before starting. If possible, save backup codes for key services such as your email, cloud storage, banking tools, business apps, or website admin panels. Backup codes can help you recover access if something goes wrong during the transfer. Although the transfer process is usually simple, having a backup plan is always safer.
How to Use Google Authenticator Transfer on a New Phone
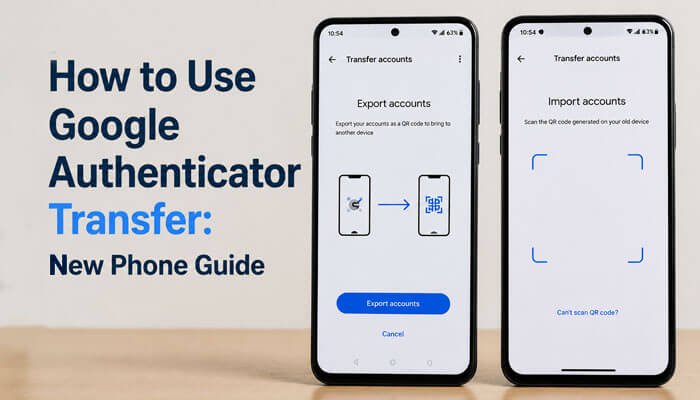
To understand how to use Google Authenticator transfer, think of the process in two parts: exporting from the old phone and importing into the new phone. On your new phone, install and open the Google Authenticator app. Tap Get Started if you are using it for the first time. Depending on your setup, you may choose to sign in with your Google Account or use the app without an account. If your codes are already synced to your Google Account, signing in may bring them to the new device automatically. If you use Google Authenticator without account syncing, you will need to transfer the codes manually.
On your old phone, open the Google Authenticator app. Tap the menu icon, usually shown as three lines or dots, depending on your device and app version. Look for Transfer accounts and then choose Export accounts. The app may ask you to unlock your phone using your PIN, fingerprint, face unlock, or another screen lock method. This extra step is important because it prevents someone else from exporting your codes without permission. After unlocking, select the accounts you want to transfer. You can choose all accounts or only specific ones. Once you continue, the app will generate one or more QR codes.
Now return to the new phone. In Google Authenticator, open the menu and choose Transfer accounts, then select Import accounts. Tap the option to scan a QR code. Use the new phone’s camera to scan the QR code displayed on the old phone. If you selected many accounts, the old phone may create multiple QR codes, so you may need to scan more than one. After scanning, the new phone should show confirmation that the accounts were imported. Check the list carefully and make sure all expected codes appear.
Using Google Account Sync Instead of Manual Transfer
A newer and easier method is to sync your Google Authenticator codes with your Google Account. When this feature is enabled, your codes can appear on another device after you sign in to the same Google Account inside Google Authenticator. This can be very useful because it reduces the risk of losing all codes when changing phones. Instead of relying only on one physical device, your codes can be available across devices connected to your account.
However, some users prefer using Google Authenticator without syncing. They may want their codes stored only on one device for privacy or security reasons. Both options can be valid depending on your needs. If you use syncing, make sure your Google Account itself is strongly protected with a secure password, passkey, recovery options, and other verification methods. If you use the app without syncing, make sure you have backup codes and transfer your accounts before losing access to the old phone. The best choice depends on your security preference, but both methods require careful handling.
How to Transfer Google Authenticator Without Losing Access
The safest way to transfer Google Authenticator is to avoid deleting anything too early. After importing your codes on the new phone, do not immediately erase the old phone. First, compare the accounts shown on both devices. Check that the names, usernames, and services look correct. Then test the most important accounts by signing in and using the code from the new phone. If the code works, you can be more confident that the transfer was successful.
It is also important to remember that authenticator codes change every few seconds. If a code fails, it may have expired before you entered it. Wait for the next code and try again. Also make sure you are using the correct code for the correct account. Many people have several entries with similar names, especially for Google accounts, work accounts, or social platforms. Renaming entries clearly can help prevent confusion later.
Once you have confirmed that your new phone works correctly, you can decide what to do with the old phone. If you plan to keep it as a backup, you may leave the codes there, but you should protect the phone with a strong screen lock. If you plan to sell, give away, recycle, or reset the old device, remove the authenticator codes first or wipe the phone securely. Never leave active authentication codes on a device that someone else may use.
What If You No Longer Have the Old Phone?
One of the most common questions about how to use Google Authenticator transfer is whether it can be done without the old phone. In most manual transfer cases, the old phone is needed because it creates the QR code for export. If you no longer have the old phone and your codes were not synced to your Google Account, you cannot simply generate the same codes again from the new app. This is because authenticator codes are based on secret setup keys saved during the original 2FA setup.
If your old phone is lost, stolen, broken, or already reset, you should try other recovery methods. Many services provide backup codes when you first enable 2FA. These backup codes can be used to sign in and reset authentication. Some services also allow recovery through email, phone number, identity verification, passkeys, or account recovery forms. For important accounts, go directly to the account’s security settings after recovering access and set up Google Authenticator again on your new phone.
If the lost phone may be in someone else’s hands, take immediate action. Secure your Google Account, change important passwords, remove the lost device from trusted devices where possible, and review account activity. If the phone had no strong lock screen, the risk is higher. This is why it is always recommended to protect your phone with a PIN, password, fingerprint, or face unlock.
Common Problems During Google Authenticator Transfer
Sometimes users face problems while transferring codes. One issue is that the Transfer accounts option may not appear. This usually means the app needs to be updated, or the user is looking in the wrong menu area. Updating Google Authenticator from the official app store often solves this problem. Another issue is that the QR code does not scan. In that case, increase the brightness of the old phone, clean the camera lens of the new phone, hold the devices steady, and make sure the full QR code is visible.
Another common problem is missing accounts after transfer. This can happen if you selected only some accounts during export or if multiple QR codes were created and you scanned only one. Repeat the export process and make sure all required accounts are selected. If the code does not work after import, check that your phone’s time settings are correct. Authenticator codes depend on time accuracy, so incorrect device time can cause login failures. Also confirm that you are entering the latest code before it expires.
Users may also become confused when they see codes on both old and new phones. This can be normal after transfer because importing does not always mean the old phone automatically loses access. You may need to manually remove codes from the old device if you do not want them there. Always make sure the new phone works before deleting codes from the old phone.
Security Tips for Google Authenticator Transfer
When learning how to use Google Authenticator transfer, security should be the main priority. The QR code used for transfer is sensitive. Do not take screenshots of it, send it through messages, upload it online, or share it with anyone. Anyone who scans that QR code may be able to import your authentication accounts. Keep the process private and perform it in a secure place.
Turn on Privacy Screen in Google Authenticator if available. This feature requires your device lock method before the app opens, adding another layer of protection. Also keep your phone’s operating system updated, use a strong screen lock, and avoid installing suspicious apps that may compromise your device. If you sync Authenticator codes with your Google Account, secure that account carefully with strong recovery options and additional verification methods.
It is also helpful to maintain backup codes for important accounts. Store them in a secure place, such as a password manager or another protected location. Do not keep backup codes in plain text on your phone’s gallery or notes app without protection. A good backup strategy can save you from lockouts if your phone is lost or damaged.
Should You Delete Codes from the Old Phone?
After you complete the transfer, you may wonder whether to delete the codes from your old phone. The answer depends on what you plan to do with that device. If you are keeping the old phone in a safe place as a backup, you may choose to keep the codes there. This can be useful if your new phone is lost or temporarily unavailable. However, the old phone must remain secure, updated, and protected with a strong lock screen.
If you are selling, giving away, repairing, or recycling the old phone, you should remove the codes from Google Authenticator and wipe the device properly. Leaving active codes on a phone that is no longer under your control creates a security risk. Even though someone may still need your password to sign in, having access to your 2FA codes weakens your account protection. The best practice is to confirm that the new phone works, save recovery options, and then remove sensitive data from the old phone before it leaves your possession.
Best Practices After the Transfer
After completing the transfer, spend a few minutes organizing your Google Authenticator app. Rename unclear entries so you can easily identify which code belongs to which account. For example, if you have multiple email addresses or business accounts, label them clearly. This helps prevent mistakes when signing in.
Next, review your security settings on important websites. Make sure your recovery email, phone number, backup codes, and trusted devices are up to date. If any account still shows the old device as a trusted device, remove it if you no longer use that phone. You should also consider adding alternative sign-in methods where available, such as passkeys or backup security options. The goal is not only to transfer codes but also to build a stronger recovery system.
Finally, remember that Google Authenticator is only one part of account protection. You should also use strong and unique passwords for every account. A password manager can help you avoid password reuse. Combining strong passwords with 2FA gives you much better protection than using passwords alone.
Conclusion
Understanding how to use Google Authenticator transfer can save you from stress, account lockouts, and security risks when changing phones. The process is simple when you still have your old device: install Google Authenticator on the new phone, open the transfer option on the old phone, export selected accounts, and scan the generated QR code with the new phone. If your codes are synced with your Google Account, signing in on the new device may make the process even easier. Still, you should always verify that the imported codes work before deleting anything from the old phone.
The most important rule is to prepare before you lose access to your old device. Keep backup codes, protect your phone with a strong lock screen, update your app, and never share transfer QR codes. When handled carefully, Google Authenticator transfer is a safe and convenient way to move your 2FA codes and continue protecting your online accounts.
FAQs
1. How do I use Google Authenticator transfer on a new phone?
To use Google Authenticator transfer, install the app on your new phone, open Google Authenticator on your old phone, go to Transfer accounts, choose Export accounts, select the accounts you want to move, and scan the QR code with the new phone using the Import accounts option.
2. Can I transfer Google Authenticator without my old phone?
Manual transfer usually requires the old phone because it generates the QR code. If you do not have the old phone and your codes were not synced, you may need to use backup codes, recovery options, or reset 2FA through each service.
3. Does Google Authenticator automatically transfer to a new phone?
It may transfer automatically if your codes are synced with your Google Account and you sign in to the same account on the new device. If you use Google Authenticator without account syncing, you need to transfer codes manually.
4. Is it safe to keep Google Authenticator on two phones?
It can be safe if both phones are under your control and protected with strong screen locks. However, if you sell, give away, or stop using the old phone, you should remove the codes from it to reduce security risks.
5. Why are my Google Authenticator codes not working after transfer?
Codes may fail if they expire before you enter them, if you choose the wrong account entry, or if your phone’s time settings are incorrect. Make sure your device time is accurate and use the newest code shown in the app.
You May Also Read
for more visit wirebusiness.co.uk