

Learning how to screen record on iPhone is very useful when you want to capture tutorials, save important app activity, record gameplay, explain a phone setting, or share something happening on your screen. The iPhone has a built-in screen recording feature, so you do not need to install any extra app. Once the option is added to Control Center, you can start recording your screen in just a few taps.
Introduction
Many iPhone users want to know how to screen record on iPhone because screen recording has become one of the easiest ways to save and share information. Whether you are helping a friend understand a setting, recording a video call demonstration, saving a social media clip for personal reference, capturing online class material, or showing a step-by-step process, the iPhone screen recording feature can make everything simple. Instead of explaining something through long messages or screenshots, you can record your screen and show the complete action clearly. This makes communication faster, easier, and more practical, especially for students, content creators, teachers, gamers, business users, and everyday iPhone owners.
The best part is that iPhone comes with a built-in screen recording tool. You do not need to download third-party apps or pay for special software. Apple has made this feature available directly inside the Control Center, which means you can start a recording almost instantly. However, many people still do not know where the screen recording button is, how to add it, how to record with sound, or where the recording is saved afterward. Some users also face common problems, such as no audio in the video, the screen recording button missing, or the recording stopping unexpectedly. This complete guide will explain everything in a simple and human-friendly way so you can use the feature confidently.
What Is Screen Recording on iPhone?
Screen recording on iPhone means capturing everything that appears on your iPhone screen as a video. Instead of taking a still screenshot, screen recording creates a moving video of your screen activity. This can include opening apps, scrolling through pages, typing, showing settings, playing a game, demonstrating a website, or explaining how to use a feature. Once the recording ends, the video is automatically saved in the Photos app, where you can watch, edit, trim, share, or delete it whenever you want.
This feature is especially helpful because it records the actual actions on your screen. For example, if someone asks you how to change a setting, you can simply record your screen while performing the steps. If you are a student, you can record important instructions from an educational app. If you are a creator, you can record app tutorials for social media. If you are a gamer, you can capture your gameplay and share highlights. The feature is simple, but it can be powerful when used properly.
How to Add Screen Recording to Control Center
Before learning how to screen record on iPhone, you first need to make sure the screen recording button is available in your Control Center. On many iPhones, the feature may already be there. However, if you do not see the screen recording icon, you can add it from Settings. Open the Settings app on your iPhone, then go to Control Center. In the list of available controls, look for Screen Recording. If it is not already included, tap the plus button next to it. After this, the screen recording option will appear in your Control Center.
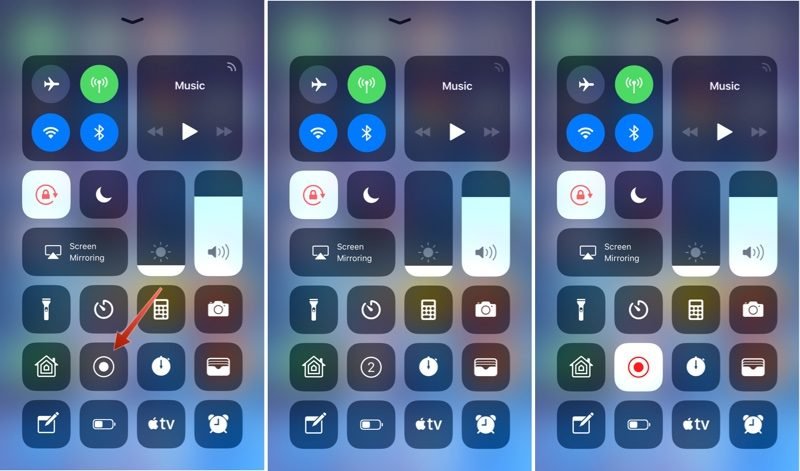
The Control Center is the quick-access menu on your iPhone. On most modern iPhones with Face ID, you open it by swiping down from the top-right corner of the screen. On older iPhones with a Home button, you usually open it by swiping up from the bottom of the screen. Once the screen recording control is added, you will see a circular icon that looks like a solid dot inside a ring. This is the Screen Recording button, and it is the main tool you will use to start recording.
How to Screen Record on iPhone Step by Step
Once the screen recording button is available in Control Center, recording your screen is very easy. First, open the app, webpage, setting, game, or screen that you want to record. Then open Control Center by swiping from the correct area of your iPhone screen. Tap the Screen Recording icon, and your iPhone will begin a short countdown before recording starts. This countdown gives you a few seconds to close Control Center and prepare the screen you want to capture.
After the countdown finishes, your iPhone starts recording everything visible on the screen. You can move between apps, scroll, open menus, type, or show any action you want to include in the video. While recording, you may see a recording indicator at the top of the screen or around the time area, depending on your iPhone model and iOS version. This lets you know that your screen is currently being recorded. When you are finished, tap the recording indicator and choose to stop, or open Control Center again and tap the screen recording button. The video will then be saved automatically in the Photos app.
How to Screen Record on iPhone with Sound
Many users do not only want to record the screen; they also want to record audio. The iPhone gives you two main types of audio recording. The first is internal app sound, which may be captured when an app allows it. The second is microphone sound, which records your voice or sounds around you. If you want to explain something while recording your screen, you need to turn on the microphone audio before starting the recording.
To record your iPhone screen with microphone sound, open Control Center and press and hold the Screen Recording button instead of tapping it quickly. A small menu will appear. In this menu, you will see the Microphone option. Tap it to turn it on, then tap Start Recording. After the countdown, your iPhone will record your screen along with your voice. This is very useful for tutorials, lectures, app reviews, troubleshooting videos, and guided explanations.
It is important to remember that some apps may block or limit audio recording due to privacy, copyright, or security rules. For example, certain video streaming apps, banking apps, and communication apps may not allow full screen recording or may prevent audio from being captured. This does not mean your iPhone is broken. It usually means the app has restrictions that control what can be recorded.
Where Are iPhone Screen Recordings Saved?
After you stop a screen recording, your iPhone automatically saves the video in the Photos app. You can open Photos and look in your recent media to find it. The recording behaves like a normal video, which means you can play it, trim it, edit it, share it through messaging apps, upload it to social media, or move it to another folder. If you use iCloud Photos, the recording may also sync across your Apple devices, depending on your settings.
Sometimes users think their recording is missing because they expect it to appear in Files or another app. In most cases, the recording is saved in Photos by default. If you record a long video, it may take a few moments to process and appear. The length and quality of the recording can also affect how much storage it uses. Long screen recordings, especially those with audio, can take a large amount of space, so it is a good idea to delete unnecessary recordings after use.
How to Edit a Screen Recording on iPhone
After learning how to screen record on iPhone, it is also useful to know how to edit the recording. Most screen recordings include extra seconds at the beginning or end because of the countdown, opening Control Center, or stopping the recording. Fortunately, you can trim these parts directly in the Photos app. Open the recording, tap Edit, then drag the video timeline handles to remove unwanted sections. Once you are happy with the result, save the edited video.
Editing is helpful because it makes your recording cleaner and more professional. For example, if you are making a tutorial, you may want the video to start exactly when the main action begins. If you recorded your voice, you may also want to remove silent parts or mistakes. The built-in editing tools are simple, but they are enough for basic trimming. For advanced editing, you can use apps like iMovie or other video editors, but for most users, the Photos app editing tool is enough.
Common Reasons to Use iPhone Screen Recording
There are many reasons why people use the iPhone screen recording feature. One of the most common reasons is teaching. If someone does not understand how to use an app or setting, a screen recording can show the process clearly. Another popular reason is content creation. Many creators record their screens to make app tutorials, reaction videos, social media guides, or educational clips. Screen recording is also useful for work, especially when explaining technical problems to support teams or showing app errors to developers.
Students can use screen recording to save explanations from learning apps, record assignment instructions, or create project demonstrations. Gamers can record gameplay moments, achievements, and strategies. Business users can record product demos, mobile app presentations, or customer support instructions. In daily life, screen recording can help you save temporary content, capture online steps, or remember something important that appears on your screen. When used responsibly, it is one of the most practical features on the iPhone.
Why Screen Recording May Not Work on iPhone
Sometimes the screen recording feature may not work as expected. One common issue is that the Screen Recording button is missing from Control Center. In that case, you need to go back to Settings and add it again. Another issue is storage. If your iPhone storage is almost full, the recording may stop or fail to save. To fix this, delete unnecessary videos, apps, or files to create more free space. Restarting your iPhone can also help if the feature is not responding properly.
Another reason screen recording may fail is app restriction. Some apps do not allow screen recording because of privacy or copyright protection. For example, streaming platforms may show a black screen or block recording. Some video call apps may also limit audio recording. In other cases, Screen Time restrictions may disable screen recording. You can check this by going to Settings, opening Screen Time, and reviewing content and privacy restrictions. Keeping your iPhone updated can also help prevent bugs and performance issues.
Why There Is No Sound in iPhone Screen Recording
A very common problem is recording the screen but getting no sound. This usually happens because the microphone was not turned on before recording. To fix this, open Control Center, press and hold the Screen Recording icon, turn on Microphone, and then start recording. If you only tap the button quickly, the microphone may remain off, so your voice will not be captured. Also, make sure your iPhone microphone is not blocked by a case, dust, or your hand while recording.
However, if you are trying to record audio from an app, the result may depend on the app’s permissions and restrictions. Some apps allow sound recording, while others block it. If the app does not allow audio capture, turning on the microphone may only record your external voice, not the app’s internal sound. You should also check that your iPhone is not connected to headphones or Bluetooth devices in a way that affects audio capture. If sound still does not work, restart your phone and try again.
Tips for Better Screen Recording Quality
If you want your screen recording to look clear and professional, prepare your iPhone before starting. Close unnecessary apps, turn on Do Not Disturb or Focus mode, and make sure your battery is charged. This prevents notifications, calls, and pop-ups from interrupting your recording. Clean up your screen if you are making a tutorial, and open the exact app or page before starting. A little preparation can make your final video look much better.
You should also speak clearly if you are using the microphone. Try recording in a quiet place so background noise does not affect your voice. Keep your explanation simple and organized. If you are recording a tutorial, move slowly enough for viewers to follow your steps. Avoid switching screens too quickly. For longer recordings, check your storage first because high-quality videos can use a lot of space. These small tips can improve the quality of your iPhone screen recording and make it more useful for viewers.
Privacy and Responsible Screen Recording
Screen recording is useful, but it should be used responsibly. Your iPhone screen may show private information such as messages, emails, phone numbers, passwords, payment details, photos, or personal notifications. Before recording, check your screen carefully and hide anything sensitive. Turning on Focus mode can help stop private notifications from appearing while recording. You should also avoid recording other people’s private conversations, personal details, or content without permission.
If you are recording a meeting, class, video call, or conversation, it is respectful and often necessary to inform the other people involved. Screen recording can capture information that others may not want shared. Responsible use protects your privacy and the privacy of others. The feature is designed to help you save and explain information, not to secretly record people or misuse content. Always think before sharing a screen recording publicly.
Best Uses of Screen Recording for Students, Workers, and Creators
For students, screen recording can be a powerful learning tool. They can record app instructions, online lessons, assignment steps, or educational explanations. Instead of taking many screenshots, students can save one complete video. Workers can use screen recording to explain problems, create training material, demonstrate mobile workflows, or send quick instructions to colleagues. This saves time because a video can explain a process more clearly than a long written message.
For content creators, screen recording is even more valuable. Creators can make tutorials, app reviews, social media guides, tech tips, and educational content directly from their iPhones. Many short-form videos begin as simple screen recordings. With voice narration and basic editing, a normal recording can become a helpful piece of content. This is why learning how to screen record on iPhone is useful for almost everyone, whether the goal is personal, educational, professional, or creative.
Conclusion
Learning how to screen record on iPhone is simple once you know where the feature is and how it works. You only need to add Screen Recording to Control Center, tap the recording button, wait for the countdown, and stop the recording when you are done. If you want to record your voice, you can press and hold the screen recording button and turn on the microphone before starting. After recording, the video is saved automatically in the Photos app, where you can edit, trim, and share it easily.
The iPhone screen recording feature is useful for tutorials, troubleshooting, online learning, gameplay, work demonstrations, and content creation. It saves time and makes explanations clearer. However, it is also important to use it carefully by protecting private information and respecting other people’s privacy. With the right preparation and settings, you can create clean, clear, and helpful screen recordings directly from your iPhone without needing any extra app.
FAQs
1. How do I screen record on iPhone?
To screen record on iPhone, first add Screen Recording to Control Center from Settings if it is not already there. Then open Control Center, tap the Screen Recording button, wait for the countdown, and start capturing your screen. When finished, tap the recording indicator or return to Control Center and stop the recording.
2. How do I screen record on iPhone with audio?
To screen record with audio, open Control Center and press and hold the Screen Recording icon. Tap Microphone to turn it on, then tap Start Recording. This will record your screen and your voice through the iPhone microphone.
3. Where does my iPhone screen recording go?
Your iPhone screen recording is saved automatically in the Photos app. You can find it with your recent videos. From there, you can watch it, edit it, trim it, share it, or delete it.
4. Why is there no sound in my iPhone screen recording?
There may be no sound because the microphone was turned off before recording. Press and hold the Screen Recording button in Control Center and turn on Microphone before starting. Some apps may also block internal audio recording because of privacy or copyright rules.
5. Can I screen record any app on iPhone?
You can screen record many apps on iPhone, but not all apps allow full recording. Some apps may block video, audio, or show a black screen due to privacy, copyright, or security restrictions. This is normal and depends on the app’s rules.
You May Also Read
for more visit wirebusiness.co.uk